Thursday, June 25, 2015

Fighting Cancer - A Family Affair (Assignment 3)


LATHROP, CA –
Her facebook page is covered in ribbons of all colors. 


Each one has a name, and a title: “survivor,” “fighter,” and “in memory.” For Carol Smith, the beginning of summer means the beginning of another round of fundraising for her team – The Cancer Kickers.


My sister Kari was diagnosed with breast cancer in 2010. Just about the same time, William (then 8) was a part of CubScouts and his local leader challenged the boys to fill a 2-litre bottle with pennies to donate to Relay For Life. William started calling everyone in our family and instead of filling 1 bottle ... he filled 17! He raised $1543 IN PENNIES that first year. The second year, William wanted to raise MORE money than the year before ... we decided the best way to do this was to start our OWN team. And the rest is history!”

(For more on the story of William’s work with pennies, see this article: http://www.mantecabulletin.com/archives/26335/)

The Smith family works together to raise money for the American Cancer Society (www.cancer.org) through the Relay For Life event (www.relayforlife.org). “We participated first in 2010; we were individuals on someone else's "team". In 2011, we formed a family team, the Cancer Kickers, and have "relayed" since then collectively as The Cancer Kickers. Our family team has members from California, Idaho, Washington and Nevada. Many family members travel to the event and it always serves as a mini family reunion for us as well!”

It’s a reunion that brings together family, friends, and supporters in an emotional tribute to those who have lost their battles and those who are continuing to fight. Jen Pellizzari, a friend of Carol’s who walked as part of her team in 2014 described her experience. “Before [the event] I was doing it to join a team and make new friends. During [the event], EMOTIONAL. They do a video slideshow of people who have lost their battle as well as a luminary where they light up hundreds of bags that have peoples name on them. It was amazing and heartbreaking all at the same time.”

High emotions are to be expected at an event that touches so many lives. For the 2013 fiscal year, ACS raised over 975 million dollars (nearly 885 million of which was from the general public) (ACS 2014 Stewardship Report http://www.cancer.org/acs/groups/content/documents/document/acspc-045486.pdf.pdf). The Cancer Kickers are proud to be doing their part. “Since 2010, our family has raised more than $72,500 for the American Cancer Society. The monies raised are used for research, education, services and advocacy.”

For 2015, donations to Cancer Kickers are in full swing. As of June 25, the team total is at $9,550. Nearly half of their $20,000 goal by July 18. Carol explains that the key to successful fundraising is just to ask. “ASK EVERYONE YOU KNOW FOR A DONATION! Most people I run into that say "I can't raise that much money" can't because they don't ask. If you don't ask, the answer will always be no. Many people feel that a donation needs to be significant ($50+) to make a difference. But I have had many people THANK ME for asking them because they had a family member battling and they didn't know how they could make a difference.”

Her straightforward approach is certainly working. Last year (2014) she raised her personal best - $2500+ by simply asking for a $5 from everyone she knew. “Of course, many people gave more than $5, but when some friends realized that $5 helped, they were willing. Whereas if I had just asked for a "donation" they might have said no thinking I needed at least $25 - $50.” It’s working again this year – for 2015, Carol herself has already raised $1,025 of her $2,000 personal goal.

(To see the Cancer Kicker’s current total, or to donate, go to: http://main.acsevents.org/site/TR?fr_id=68475&pg=team&team_id=1683471

To see Carol’s personal total, or to donate, go to: http://main.acsevents.org/site/TR?px=17628587&fr_id=68475&pg=personal).

Saturday, June 13, 2015

Weather or Not...Definitely Weather


STOCKTON, CA –
Summer temperatures in Northern California rose steeply at the beginning of June. Though not a record year – yet – the 104°temperature on June 8 is getting close. Stockton residents are feeling the pressure of the heat.

Screenshot from CustomWeather.com showing the near record highs in Stockton.
 
The heat affects me and my family tremendously. Anything that is outdoors I have to carefully consider, not just for comfort, but also for safety.” Local photographer and mother, Christine Curry, expressed concerns about the effect that higher temperatures will have on her business and family.
“Because I’m a photographer, I have had to postpone many sessions due to the heat. I take medication that requires me to stay out of the sun, so shooting in the mid-day heat, just doesn't work. …when summer comes, my bill jumps typically by $300+ more a month. Because of the drought, my kids can't go out and play in the hose/sprinklers. So that means we all lay low inside the house.”
The Curry family aren’t the only ones hiding out inside to escape the heat. Another local mom, B.J. Mooney, explains, “I don't mind the hot weather, it's the trying not to turn on the air since it's a financial burden on me. I work so I get the nice cool air there. I turn on all the fans in the house.”
Screenshot from weather.com
10-Day forecast for Stockton - more heat means more time indoors for residents.

Financial concerns are a big deal for California residents, and the additional stress of summer heat waves sends more numbers than the thermometer upward. “Our bill can jump by $300 in the summer; we have a tri-level house. The top level will be 100° and the bottom will be 85° - so hot.” Another mom, Tina Martinez, is also dealing with the additional financial burden of the heat.
The sun scorches down on Stockton - at 103°

The extreme drought in California and the extra high temperatures are not making it easy for residents. The cost of living in California is already in the top three most expensive in the US, and additional costs due to heat and lack of water are only adding to an already bad situation.
Stockton is in the middle of a Chapter 9 bankruptcy, so there’s no real help from the government available to cut energy costs. Many residents try to update their homes in order to keep energy costs lower, and solar energy is a growing industry.
Occupants are recommended to have regular maintenance done on their AC units, run indoor fans as often as possible, and turn up their thermostats a degree or two to help bring costs down.

Tuesday, November 13, 2012

Awesome new book...for Christmas!!

I follow a lot of couponing blogs...I try to stick to a pretty strict budget each paycheck...and I try to find great new ways to save money and get creative.....

So this is fantastic!! One of my favorite blogs is Money Saving Mom - Crystal has some great ideas, and I love reading about her sweet family.

Now she has a new book out just in time for Christmas! I just got my copy here at Amazon - you should, too!!

Merry Christmas (early ;-))!!

Friday, September 28, 2012

Apple Party!!

It's officially FALL!! And that means it was time for an Apple Party to celebrate! Throughout September, the boys and I have been decorating the house for fall (see our crafts here: Part 1, Part 2, and Part 3). We also spent the morning of the party getting some fantastic apple food ready! This included Grandma Melba's Apple Nothin', hot apple cider, a caramel apple slice dipping bar (with homemade salted caramel!), caramel marshmallow popcorn, and apple butter spice cake!!

The table was set with my cute new fall tablecloth and new fall plates and bowls! As well as the returning scarecrows in jars of beans (they were new last year :-)).

Caramel apple slice dipping bar - caramel candy corn, chocolate chips, M&M's, marshmallows, and sprinkles (which weren't on the table yet when I took this picture...silly)

The apple butter cake was delicious and moist, and sooo very fall-ish!

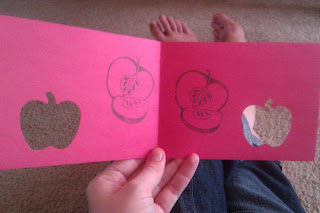
Nu-nuh brought her apple punch, stamps and fall construction paper to make fun cards - Ethan had to push very hard to make it work!!

Emy enjoyed the apple cider!

This was my sweet card from Ethan...he designed it himself!

And I was told I could have one apple - Andrew got the other one!

All in all, it was a fun time! Lots of delicious food, the smell of fall all throughout my house, a little rain and hailstorm outside, and "Holiday Inn" as our movie of choice for the afternoon.

Can't wait for next month's Halloween party together!

Fall Crafts with the kiddos...part 3

To continue our fun fall decorating for our Apple Party, we're onto Part 3 of the apple crafts I made with the boys (well, mostly with Ethan...Andrew usually just plays :-)). (Part 1 and Part 2 can be found there and there ;-))

These last two apple projects were simple, and turned out so cute!


I love how the cereal box apples (originally found here) turned out!! And the balloon apple tree was just a last minute idea to fill up some wall space above our tv that looked lonely...

Ethan did help me color the cereal box apples, but I did the wrapping and stems/leaves myself (sharp scissors and such)...

Cereal Box Apples:
Supples:
empty cereal boxes (or other cardboard boxes - the smaller one we did was a cake mix box!)
construction paper (I used yellow for ours, but green, red or even plain brown or white (to then be colored) would be fine!)
tape
markers, crayons, colored pencils, or paint (for making your apples your own!)
scissors
popsicle sticks
green pipe cleaners

Instructions:
1. Cover your boxes with the construction paper - wrap carefully like you would a present. Tape down the edges well (mine needed a little packing tape reinforcement - they were trying to pop open!)
2. Color (paint, etc.) your apples the way you want them - Ethan wanted to make his with letters and such, I wanted mine a little more uniform ;-)
3. Poke a hole in the top of the boxes (about the size of one side of the scissors). Form the pipe cleaner into two loops (leaves) and insert the pipe cleaner and popsicle stick into the hole in the box together. (I didn't need to secure them with anything else, the small hole with the tension of the popsicle stick and the pipe cleaner was enough to keep them stable.)

These are a totally different shape than a normal apple, which makes them cute!

The tree doesn't really need much instruction - cut out tree shapes, pin to wall, add some balloons. Simple, right? But it turned out cute too!


Bonus! I nearly forgot about this cute little craft, which was totally a mommy-only one (it was hard for me to get it right, I can't imagine trying to wrangle a couple of kids doing it too!).


These are so cute and woodsy! Another Pinterest idea originally found here, I thought this would be a neat way to dress up some old candles (found at a thrift store for about $1 for 3 candles! haha!!).

Super simple in concept, but took a little finagling to get the cinnamon to stay put while I tied the ribbon.

Cinnamon Candles:
Supplies:
basic candles (unscented)
cinnamon sticks (I ended up finding mine at Costco after a fruitless search at grocery and craft stores...)
ribbon
tape

Instructions:
1. Place the cinnamon sticks around the candle (For the taller candle here, I cut the sticks in half, for the smaller one, I cut them into thirds - use scissors, they worked much better than a knife!) - use tape to keep them in place if needed (I couldn't figure out a way to keep them up without the tape, so I taped around the bottom, then removed it when the ribbon was tied.)
2. Tie the ribbon tightly around the middle of the candle/cinnamon sticks. Make a bow, or a simple knot (like mine).
3. Remove the tape (if you used it), and fill in any gaps with more cinnamon sticks. (My bow didn't seem to be tight enough, so I added a few more cinnamon sticks to complete the candles.)
4. Light and enjoy! The smell of the cinnamon should start to come out when the wax has melted down far enough to warm the sticks themselves. Mine in the picture here were still far to tall to be smelling good - but the cinnamon sticks alone smell amazing, so I can't wait to light them again! 


Fall Crafts with the kiddos...part 2

I mentioned earlier that we had an Apple Party yesterday to celebrate fall. In getting ready we did a bunch of apple and fall-themed crafts! You can see Part 1 here, and now we're onto Part 2! These next two crafts I did mostly on my own, with Ethan watching (and trying to snack on!) and playing nearby. Some days, craft time is just for mommy :-P

These are (of course) Pinterest inspired, and originally were found here (yarn apples) and here (tulle apples) (the tuille ones were originally pumpkins, and will be pumpkins for next month, but I modified for apple/fall time!!).

These were super easy to make, and made a cute little centerpiece for our Apple Party table.

Yarn Apples:
Supplies:
red yarn
base form (for mine, I used some leftover plastic mini-pumpkins from my front door project)
green pipe cleaner (not shown on mine - I ran out! So I only used them on the tulle apples)

Instructions:
1. Wrap the base form with the red yarn, being sure to tuck in the first end to ensure no unraveling!
2. Tie the yarn off tightly by sticking the tail end through one of the loops and securing with a small knot. (I double knotted mine - safer that way!)
3. Slip the pipe cleaner through one of the top loops of yarn, and form two small loops for leaves. Twist to keep in place.

Tulle Apples:
Supplies:
Red tulle
Small red candy (the original uses jelly beans, but I couldn't find any all red jelly beans, so I went with a boxed "red only" candy instead)
green pipe cleaners
brown pipe cleaners (not shown on mine, because I didn't have any on hand...I just used the top of the tuille for my "stem")

Instructions:
1. Cut the tulle into squares (mine were about 6in squares) - I did a double layer for each apple, but that's a personal preference.
2. Place a handful of candy into the center of the tulle square(s) and pull the tulle up around it, forming a ball (apple!).
3. Twist the brown pipe cleaner around the top of the tulle ball, securing the candy inside and forming the stem.
4. Trim any extra tulle from the top of the stem. Wrap the green pipe cleaner through the stem, and make two loops (leaves). Twist to secure.

I loved the way these turned out, even with my missing pipe cleaners! I look forward to making them over again next month with new colors!

Fall Crafts with the kiddos...part 1

Yesterday we had an Apple Party to celebrate the arrival of fall, and the ending of September (I'm going to redecorate my house with pumpkins in October, so we're enjoying the apples until then!).

To get the house ready for the party, Ethan and I made lots of cute (Pinterest inspired, of course!) apple crafts. Most were super simple, and didn't take much time. There are quite a few of them though, so the crafts are going to take up a couple of posts...

First, we decorated the glass door and the front door window. This was actually two crafts, but we did them on the same day.
Over the door is a streamer banner with apple paint prints that reads "Welcome Fall." On the window/door itself are "stained glass" tissue paper apples. So cute, right?

Apple Paint Print Banner:
Supplies:
apples, cut in half from top to bottom
paper (we used a roll of butcher paper, but you could really use anything)
paint (we used washable finger paints to make sure my kitchen floor was safe ;-), but any paint would work)
scissors
marker
streamer
mini-clothespins (or staples/tape - this will be used to attach the apples to the banner, so it's personal preference or what you have on hand!)
tape (or stick pins - this will be used to attach the banner to your chosen location, I used tape because it's hard to stick pin through a plastic blind header!)

Instructions:
1. Dip the half apples into the paint, and use like a stamp onto the paper. The more times you use the same apple (without re-dipping the paint), the more interesting the apple prints get. The first print will be very paint-y, while the later prints will be more apple-y.
2. Let dry. Cut out the apple prints and decide on the color order you want them in on the final banner (Ours went red-green-red-green-etc.).
3. Write your message using the marker. Remember to leave a "space apple"  between words!
4. Pin your apples to the streamer - I actually measured the distance between each apple and made it all mathematically even (oh, so OCD!), but feel free to be creative!
5. Attach your streamer to the wall (or, as in my case, the header to the blinds on the backdoor), and enjoy the cuteness of fall!

"Stained Glass" Tissue Paper Apples (and leaves!):
Supplies:
clear contact paper (can be found in the kitchen supply aisle)
tissue paper
construction paper
pen/pencil
scissors
tape

Instructions:
1. Decide on your design - you can freestyle your shapes, or you can (like me) find something cute online and trace it ;-) - and draw it out on the construction paper. Be sure to make the shapes large enough to leave space in the middle for the tissue paper.
2. Cut out your shapes. Then, cut out the insides of your shapes - you really only need a little border to give some defined shape to the project. If you would prefer a thicker or thinner border, go for it! Ours were about an inch wide for the apples, and about half an inch for the leaves.
3. Cut your tissue paper into small squares. I cut ours into strips, then into squares - trying to keep them mostly even!
4. Cut your contact paper to be a square just larger than your shape. You'll need two even pieces for each shape.
5. Peel the backing off one piece of contact paper and lay it, sticky side up, on the table. Center a shape in the middle of the contact paper and press down evenly.
6. Fill it in! This is the fun part where you get to be creative. You can make patterns or be totally random with your placement (even for my OCD mind, the creative ones were the ones that turned out better, because real apples and leaves don't usually have stripe patterns!). Simply place the tissue squares into the center of the shape, pressing them lightly onto the contact paper.
7. When your shape is filled in as you like it, peel the backing off the second piece of contact paper. Carefully align the edge of the two pieces, and press the sticky side of the second piece slowly onto the finished shape. This can take a little patience, because you don't want air bubbles or things to stick in the wrong place! Press the finished square firmly together to make sure it will hold well.
8. Cut out your finished shape - leave a little border around the edge (ours was about a quarter inch) to make sure you don't accidentally cut your shape!
9. Attach to your windows and glass doors with tape, and enjoy the light coming through!


Ethan had a great time with the apple painting - he thought it was so funny to be using food to paint!